By Janelle Payne (aka @nailgunnelly)
Every home has that one wall that just sits there — empty, uninspired, and begging for a purpose. For DIY enthusiast Janelle Payne, known online as @nailgunnelly, that blank space became the canvas for a brilliant idea: a hidden storage cabinet cleverly tucked between wall studs and disguised as a piece of art.
✨ The Inspiration: Turning Dead Space into Smart Space
“I love DIY projects and finding new ways to make my home both functional and beautiful,” Janelle shares. “This time, I wanted to create extra storage that would stay hidden — until you open the artwork and reveal what’s behind it.”
Her goal? A sleek, organized solution to store small everyday essentials like keys, sunglasses, and mail — without adding clutter.
🧰 The Setup: Finding the Perfect Wall
Janelle chose a small section right beside her front door — an ideal spot for an entryway drop zone. Before cutting, she emphasized an essential rule for any DIY wall project: always locate the studs.
“Anywhere there’s an outlet, you know there’s a stud on one side or the other,” she explains.
Using a stud finder, she marked the space between two studs — typically 16 inches apart — ensuring she wouldn’t hit any electrical wiring or vents.
Pro Tip 💡: Use a small inspection camera to peek inside your wall before making major cuts. It can connect right to your phone for a clear view of what’s behind the drywall.
🪵 Building the Hidden Compartment
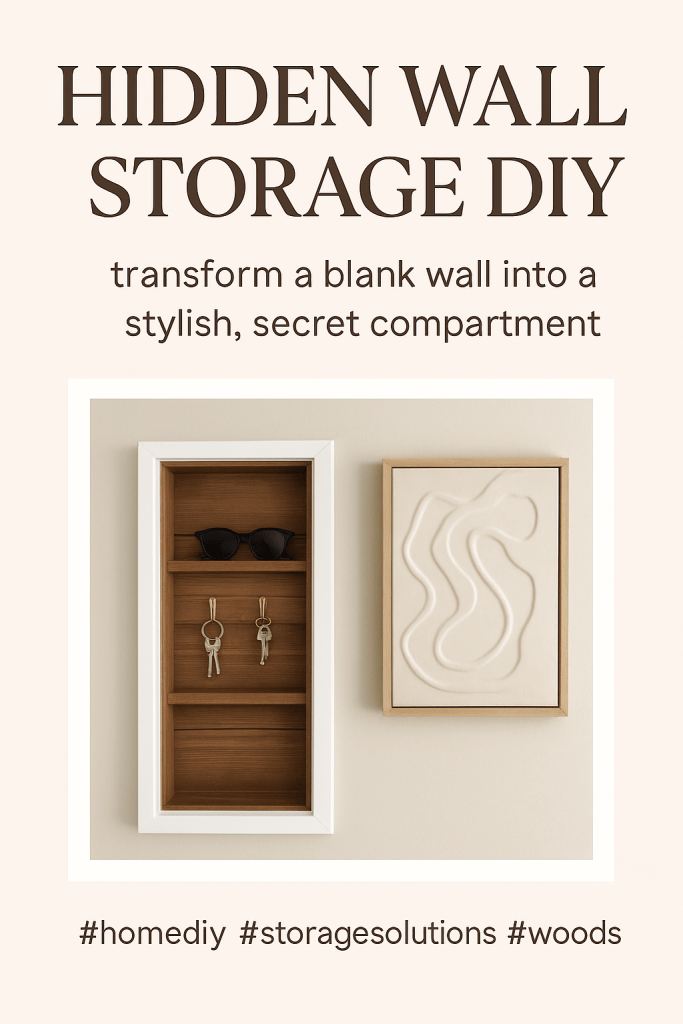
Once she confirmed the wall cavity was clear, Janelle cut an opening and built a framed box to fit snugly between the studs. Using 1×4 primed MDF boards and lightweight cedar planking for the backing, she crafted a custom insert complete with small interior shelves.
“It’s basically like installing a recessed medicine cabinet,” she says, “but for your keys and daily essentials.”
Each piece was secured with wood glue and brad nails, making the structure sturdy yet simple to assemble.
🔩 Adding Function and Style
To make it practical, Janelle installed small gold hooks for hanging keys and sunglasses. The shelves were arranged to allow enough clearance for hanging items, with additional space for small décor or mail.
And because this project is about details, she even added a motion-activated LED light inside.
“It turns on automatically when you open it — how cool is that?” she laughs.
🖼️ The Finishing Touch: Hidden Behind Art
The pièce de résistance? The storage is concealed behind a framed art piece mounted on hinges.
Janelle attached the artwork to a slim frame that serves as a door, making it easy to change the art anytime without moving the hinges.
“Having it hidden makes it so much cooler,” she says. “You’d never guess there’s storage behind it!”
When closed, the piece looks like an elegant wall accent. When opened, it reveals an organized, well-lit mini storage area — perfect for modern, clutter-free living.
💡 Why This DIY Works
This project combines aesthetics and practicality — a true reflection of the DIY spirit. It’s affordable, customizable, and can be completed in just a few hours with basic tools.
Materials used:
- Stud finder or wall camera
- 1×4 MDF boards
- Cedar planking (tongue and groove)
- Wood glue & brad nails
- Hinges and frame for artwork
- Gold hooks or pegs
- Motion sensor LED light
Estimated cost: Under $50–$80, depending on materials on hand.

🏡 Final Reveal: A Hidden Gem
As Janelle installed the final piece of trim, the project came together beautifully — flush with the wall, perfectly aligned, and seamlessly integrated.
“Now when we come home, our keys and sunglasses go right in their spot. It’s neat, it’s hidden, and it looks amazing.”
What began as a blank wall transformed into a smart, stylish storage solution that elevates the entire entryway.
🌟 Takeaway
If you’re short on space (or just love clever design), this hidden wall storage DIY is a weekend project worth trying.
It’s proof that with a little creativity — and a few power tools — even the most overlooked spaces can become your home’s most impressive features.
Follow Janelle (@nailgunnelly) on Instagram for more smart home DIYs, budget-friendly decor hacks, and inspiration to make every inch of your home work harder — and look better.


Leave a comment